For all Streaming Boxes in Skoda Roomster (2008) with Radio Cruise PN1 - retrofit USB / SD interface
These instructions describe an example of how you can install a USB / SD interface in a Skoda Roomster (2008). You can retrofit all Streaming Boxes in a comparable way.
In this example, a Cruise PN1 radio is used. These instructions can also serve as a template for retrofitting other radio models, e.g. Dance, Swing, etc.

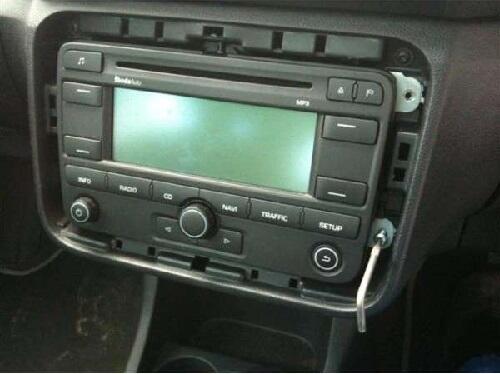
 Skoda Roomster - radio Cruise PN1 - remove the panel around the radio

First, the panel around the radio has to be removed so that the fastening screws of the radio can be accessed.
In this case, you can easily do this with a shopping chip. As can be seen in the photo, this is attached to the cover and then turned slightly so that the cover comes off.

You can now carefully remove the panel from this point.
 Skoda Roomster - radio Cruise PN1 - remove the radio


Now unscrew the 4 Torx screws so that you can pull out the radio.
 Skoda Roomster - radio Cruise PN1 - lay the interface cable

The connection cable can be placed in the radio slot by opening the glove compartment as shown.
Start here in the glove compartment and run the cable from there into the radio slot.
 Skoda Roomster - radio Cruise PN1 - connect the USB interface

The connection cable of the USB interface now appears in the radio slot.
 Skoda Roomster - radio Cruise PN1 - connect ground cable

Connect the ground cable on the connection cable to a screw on the radio housing. Make sure that the spot is bare and not painted. Otherwise this point would not have any ground and the interface would not work.
 Skoda Roomster - radio Cruise PN1 - connect interface and install radio

The connector can now be plugged into the large Quadlock connector from behind. Seen from the rear, this is the lower left chamber of the Quadlock connector.

Here you can see the fully equipped Quadlock connector plugged into the radio.
 Skoda Roomster - radio Cruise PN1 - assembly completion

If you have installed a CD changer, it is advisable to position the switch (left) in the glove compartment. If there is no CD changer, the switch (left) can be hidden behind the panel.
Damit wäre der Einbau beendet.
Hinweise zur Bestückung des USB-Sticks bzw. der SD-Karte mit MP3-Dateien finden Sie in der Dokumentation und der Anleitung.
ATTENTION: Before installing the radio, please test all functions of the interface / streaming box. If everything works, you can go to complete the assembly.
These installation example instructions are only intended as a model for the installation mentioned. In principle, no liability is accepted.
Errors or problems of any kind cannot be ruled out. We are happy to be at your disposal during the installation. faq@usb-nachruesten.de
